Do you want to fully uninstall StealthNet when you don’t need to use it? Do you feel helpless when you try to delete StealthNet but you can’t do that? Don’t worry. It is not difficult if you follow the StealthNet removal tips in this article. Before you delete the program, you should know something about it.
StealthNet P2P is your all in one solution to all of your files sharing needs. While it can be used to download free songs, videos, games, StealthNet can be used to create, upload, and download torrents. Recently,it has been added a optimization plug-in that no other software has. This plugin increases download speeds by over 50%. Best of all, this is free and will always remain free. Although we appreciate your donations; there is no paid version.
The way to remove StealthNet P2P with default uninstaller
Alternatively, if the StealthNet application is open, choose File > Exit.
On the Windows taskbar, choose Start > All Programs > StealthNet > Uninstall StealthNet.
The Initializing Wise Uninstall Wizard screen appears briefly.
Click “Next” on the Installation Wizard and the software removal process begins.
Remove StealthNet P2P of related files
Open Search to make a full search for StealthNet related files.(When you open it, please keep in mind to select Local Hard Drives as your search scale.)
Delete all the files it shows before you.
Turn to Start Menu and then go to Run.
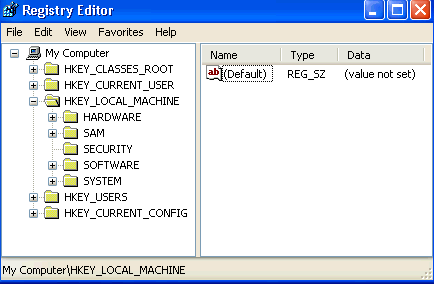
Enter regedit and then click OK to open Registry Editor.
Under folder HKEY_CURRENT_USER and HKEY_LOCAL_MACHINE, you will find StealthNet related entries. Please delete them once for all.
Lastly, reboot your PC.
In fact, to uninstall StealthNet completely, you can use a powerful, professional uninstall tool. Perfect Uninstaller is highly recommended for you. You can uninstall StealthNet easily and remove BearShare 10.0 completely with Perfect Uninstaller. What’s more, it enables you to remove all hidden leftovers related to StealthNet and thus keep you from future trouble.
Download and Run the Perfect Uninstaller to Uninstall StealthNet
Double click on the Perfect Uninstaller icon to start the tool.
Locate the program on the display list. Follow the on-screen instructions to complete the removal.
Finally, you just need to reboot your computer and StealthNet will be fully uninstalled
2014年6月15日星期日
What Can I Do to Fully Uninstall StealthNet When You Don’t Need It
Do you want to fully uninstall StealthNet when you don’t need to use it? Do you feel helpless when you try to delete StealthNet but you can’t do that? Don’t worry. It is not difficult if you follow the StealthNet removal tips in this article. Before you delete the program, you should know something about it.
StealthNet P2P is your all in one solution to all of your files sharing needs. While it can be used to download free songs, videos, games, StealthNet can be used to create, upload, and download torrents. Recently,it has been added a optimization plug-in that no other software has. This plugin increases download speeds by over 50%. Best of all, this is free and will always remain free. Although we appreciate your donations; there is no paid version.
The way to remove StealthNet P2P with default uninstaller
Alternatively, if the StealthNet application is open, choose File > Exit.
On the Windows taskbar, choose Start > All Programs > StealthNet > Uninstall StealthNet.
The Initializing Wise Uninstall Wizard screen appears briefly.
Click “Next” on the Installation Wizard and the software removal process begins.
Remove StealthNet P2P of related files
Open Search to make a full search for StealthNet related files.(When you open it, please keep in mind to select Local Hard Drives as your search scale.)
Delete all the files it shows before you.
Turn to Start Menu and then go to Run.
Enter regedit and then click OK to open Registry Editor.
Under folder HKEY_CURRENT_USER and HKEY_LOCAL_MACHINE, you will find StealthNet related entries. Please delete them once for all.
Lastly, reboot your PC.
In fact, to uninstall StealthNet completely, you can use a powerful, professional uninstall tool. Perfect Uninstaller is highly recommended for you. You can uninstall StealthNet easily and remove BearShare 10.0 completely with Perfect Uninstaller. What’s more, it enables you to remove all hidden leftovers related to StealthNet and thus keep you from future trouble.
Download and Run the Perfect Uninstaller to Uninstall StealthNet
Double click on the Perfect Uninstaller icon to start the tool.
Locate the program on the display list. Follow the on-screen instructions to complete the removal.
Finally, you just need to reboot your computer and StealthNet will be fully uninstalled
What is the best software removal tip to fully remove iDeduper from your PC?
When you decide to remove iDeduper, you have to make sure you can totally delete it. But, it is not easy to completely uninstall iDeduper. You have to follow the removal guides step by steps.
iDeduper is software to find and delete duplicate songs on iTunes faster (iTunes duplicate remover free to try). You can customize which tag to be compared and how similar are they. After search, you can use auto marking to automatically mark duplicate songs for deletion.
If the program does not do everything to improve your PC or job, this means you should remove it.
Download and save the IDeduper uninstaller on its website.
Close all applications.
Check the taskbar and the system tray to make sure that no user applications are running.
Run the program uninstaller.
Click “Yes” to the message “Do you want to allow the following program to make changes to this computer?”. In the end, you need to reboot your computer.
If you can not remove iDeduper by following the removal tips above, you need to try the following.
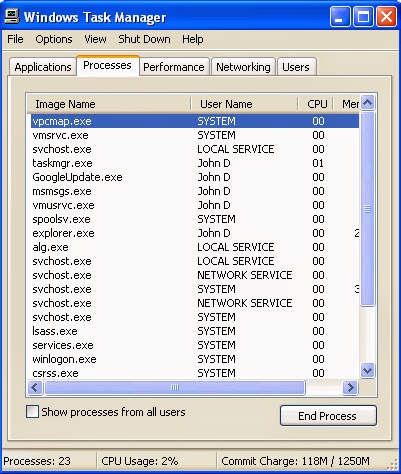
Open the Windows Task Manager by pressing Ctrl + Alt + Delete on the keyboard.
End all processes related to IDeduper.
Go to Start Menu and then click on Run.
Enter regedit to activate the Registry Editor, and scroll down all folders to find and delete every related keys such as HKEY_CURRENT_USER\Software\IDeduper, HKEY_LOCAL_MACHINE\Software\IDeduper.
After applying the first two methods above, you may find that both of them cannot fully uninstall IDeduper while leaving some useless files and registry entries on your system. On the contrary, you will find that IDeduper is completely uninstalled with the help of Perfect Uninstaller. Perfect Uninstaller is a powerful, trusted and reliable uninstall tool that can help you uninstall IDeduper in a fast, secure and convenient way. A very useful feature of Perfect Uninstaller is that it not only deletes those unwanted programs like Matlab, but also force uninstalls all of the unwanted leftovers.
iDeduper is software to find and delete duplicate songs on iTunes faster (iTunes duplicate remover free to try). You can customize which tag to be compared and how similar are they. After search, you can use auto marking to automatically mark duplicate songs for deletion.
If the program does not do everything to improve your PC or job, this means you should remove it.
Download and save the IDeduper uninstaller on its website.
Close all applications.
Check the taskbar and the system tray to make sure that no user applications are running.
Run the program uninstaller.
Click “Yes” to the message “Do you want to allow the following program to make changes to this computer?”. In the end, you need to reboot your computer.
If you can not remove iDeduper by following the removal tips above, you need to try the following.
Open the Windows Task Manager by pressing Ctrl + Alt + Delete on the keyboard.
End all processes related to IDeduper.
Go to Start Menu and then click on Run.
Enter regedit to activate the Registry Editor, and scroll down all folders to find and delete every related keys such as HKEY_CURRENT_USER\Software\IDeduper, HKEY_LOCAL_MACHINE\Software\IDeduper.
After applying the first two methods above, you may find that both of them cannot fully uninstall IDeduper while leaving some useless files and registry entries on your system. On the contrary, you will find that IDeduper is completely uninstalled with the help of Perfect Uninstaller. Perfect Uninstaller is a powerful, trusted and reliable uninstall tool that can help you uninstall IDeduper in a fast, secure and convenient way. A very useful feature of Perfect Uninstaller is that it not only deletes those unwanted programs like Matlab, but also force uninstalls all of the unwanted leftovers.
Uninstall CCleaner Guides – The Best Removal Tips to Fully Remove CCleaner from Your PC
Do you want to uninstall CCleaner from your pc since you would like to use another pc fix tool? You need to delete CCleaner due to it is not good for you. However, CCleaner is a freeware system optimization, privacy and cleaning tool. It removes unused files from your system – allowing Windows to run faster and freeing up valuable hard disk space. It also cleans traces of your online activities such as your Internet history. Additionally it contains a fully featured registry cleaner.Last but not least, it has added Firefox Jumplist Cache cleaning and improved Google Chrome Internet History cleaning for typed URLs. But, you do need to get rid of it if you don’t like it.
How do I remove CCleaner with its own uninstaller?
Click the Start menu on your computer taskbar, and select Run.
Type cmd in the box to open a command prompt, and then type C:\ Program Files\CCleaner to change directory.
Type CCleaner.exe – uninstall in order to uninstall the CCleaner. After the removal finish, restart your computer.
How can I remove registry entry of CCleaner?
Click Start Menu, and then open Search.
Fill in the blank with the program and then choose Local hard Drives.
Click Search and wait all related files are shown before you.
Select those files once for all and right-click your mouse to Delete.
Back to Start Menu and turn to Run.
Enter regedit and click “Yes” to open Registry Editor.
Locate every related entries of CCleaner and delete it under the plus folder.
Reboot your PC if you want.
If it is impossible for you to accomplish these manual steps to remove CCleaner or uninstall PC Optimizer, the last sort should be professional uninstaller tool.
CCleaner Uninstall Tool
Download and install Uninstaller.
Run it and look through programs listed your computer.
Highlight CCleaner on the list, and click Uninstall.
Follow the prompts to continue the uninstall process of CCleaner
2014年6月12日星期四
How Can I Fully Remove Panda Internet Security from Windows 8
Are you looking for a best solution when Panda Internet Security won’t uninstall in Windows 8?


Do you want to remove Panda Internet Security because it frequently shows up the annoying error message saying "An error (-5009 : 0x8002802b) has occurred while running the setup...."
Have you ever been annoyed that you have uninstalled Panda Internet Security through Windows Control Pane, but it is still there after you reboot your pc?
Take it easy! You could learn and follow Panda Internet Security uninstall instructions in this article.
How to fully uninstall Panda Internet Security from your PC?
There are 2 effective program removal guides for you to choose.
Method 1: Remove Panda Internet Security with a standard way
Tips 1: How to entirely uninstall Panda Internet Security through Windows Uninstall applet
Most of you would like to get rid of program through Windows Control Panel. However, you might miss some steps so that you are not able to delete Panda Internet Security. Fortunately, you could follow the detailed software removal instructions as below.
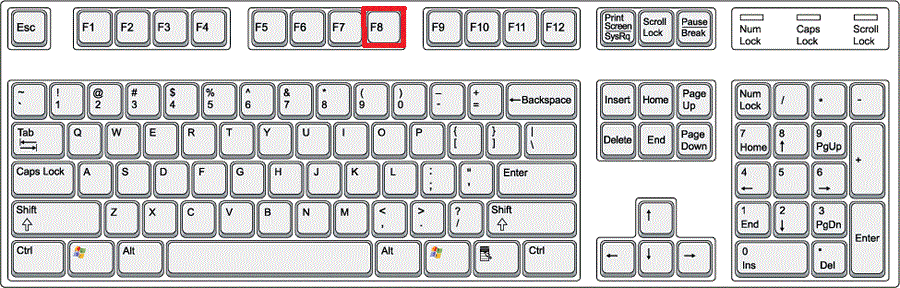
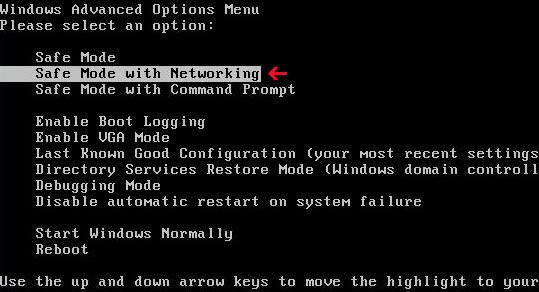
You should reboot your PC and press F8 key on your keyboard. This will open up the Advanced Boot Options screen, in Windows 7 or Vista, or the Windows Advanced Options Menu in Windows XP. Using the arrow keys on your keyboard, highlight the option labeled Safe Mode with Networking. Once it is highlighted, click on the Enter key on your keyboard.
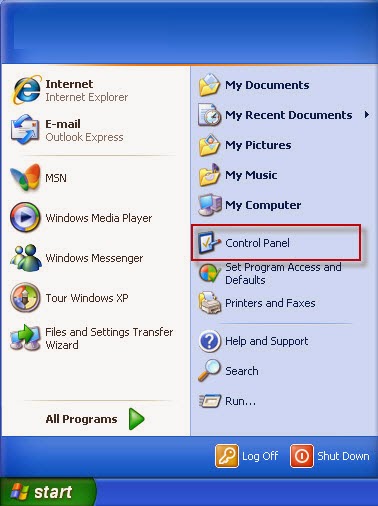
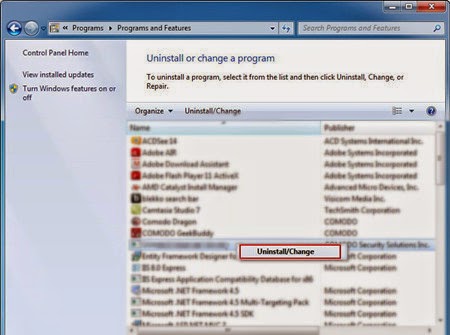
Click “Start Menu” > Select Control Panel option > “Uninstall a Program” (Programs and Features) > Find Panda Internet Security on the currently installed programs list and its related entries > Click “Uninstall or Change” to delete the application.
And then, you should go back and click “Start Menu” button and select “Run.” > Type “regedit” into the box and click “OK” to open Registry Editor> search and locate all registry entries related to Panda Internet Security.
HKEY_CURRENT_USER\Software\Microsoft\Windows\CurrentVersion\Run\[RANDOM CHARACTERS].exe
HKEY_LOCAL_MACHINE\Software\Microsoft\Windows NT\CurrentVersion
How to Manually Get Rid of Panda Internet Security from your laptop?
Step 1: Stop all the related processes in Task Manager
Disable all the unneeded processes
Guide: Open task manager by pressing Alt+Ctrl+Del keys at the same time. Another way is to click on the Start button and choose Run option, then type taskmgr into and press OK.
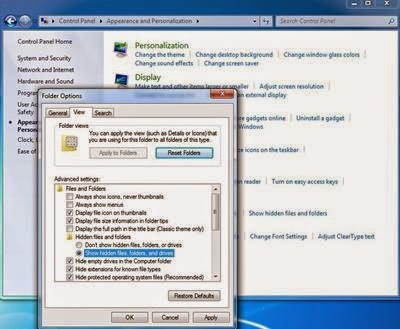
Step 2: show hidden files and folders and delete all the following files.
Guide: click the Start button and choose Control Panel, clicking Appearance and Personalization, to find Folder Options then double-click on it. In the pop-up dialog box, click the View tab and uncheck Hide protected operating system files (Recommended).
Delete all the following files related to Panda Internet Security
%AppData%\.exe
%CommonAppData%\.exe
C:\Windows\Temp\.exe
%temp%\.exe
C:\Program Files\
Step 3: open Registry Editor to delete all invalid registries entries as below
Guide: open Registry Editor by pressing Window+R keys together.(another way is clicking on the Start button and choosing Run option, then typing into Regedit and pressing Enter. )
Delete all the related registries as below:
HKEY_LOCAL_MACHINE\SOFTWARE\Microsoft\Windows NT\CurrentVersion\Image File Execution Options\msconfig.exe
HKEY_LOCAL_MACHINE\SOFTWARE\Microsoft\Windows NT\CurrentVersion\Image File Execution Options\msmpeng.exe
HKEY_LOCAL_MACHINE\SOFTWARE\Microsoft\Windows NT\CurrentVersion\Image File Execution Options\msseces.exe
HKEY_CURRENT_USER\Software\Microsoft\Windows NT\CurrentVersion\Winlogon "Shell" = "%AppData%\.exe"
HKLM\SOFTWARE\Classes\AppID\.exe
After you finish steps, you should restart your pc to confirm the Panda Internet Security removal. If you are not good at handling this method, you could try Tips 2 as following./www.uninstalltips.com/completely-uninstall-cocoon-the-best-effective-cocoon-removal-guides/
Can't Uninstall Amazon Cloud Drive - How Can I Fully Remove Amazon Cloud Drive with Its Removal Guides
Do you want to remove Amazon Cloud Drive due to it frequently shows up the annoying Ads message?


Have you ever been frustrated that you have deleted Amazon Cloud Drive, but it is still there?
When you are unable to delete Amazon Cloud Drive by manual and you don’t know much about Amazon Cloud Drive removal tips, you could learn and follow its uninstall instructions in this article.
How to fully uninstall Amazon Cloud Drive from your PC?
Method 1: Remove Amazon Cloud Drive with a standard way
Method 2: Remove Amazon Cloud Drive with program removal tool called Perfect Uninstaller
Tips 1: How to delete Amazon Cloud Drive through Windows Uninstall applet
Most of you would like to get rid of program through Windows Control Panel. However, you might miss some steps so that you are not able to delete Amazon Cloud Drive. Here are the removal guides:
You should reboot your PC and press F8 key on your keyboard. This will open up the Advanced Boot Options screen, in Windows 7 or Vista, or the Windows Advanced Options Menu in Windows XP. Using the arrow keys on your keyboard, highlight the option labeled Safe Mode. Once it is highlighted, click on the Enter key on your keyboard.
Click “Start Menu” > Select Control Panel option > “Prorams and Features” > Find Amazon Cloud Drive on the currently installed programs list and its related entries > Click “Uninstall or Change” to delete the application.
And then, you should go back and click “Start menu” button and select “Run.” > Type “regedit” into the box and click “OK” > search and locate all registry entries about Amazon Cloud Drive.
HKEY_CURRENT_USER\Software\Microsoft\Windows\CurrentVersion\Run\[RANDOM CHARACTERS].exe
HKEY_LOCAL_MACHINE\Software\Microsoft\Windows NT\CurrentVersion
After you finish steps, you should restart your pc to confirm the Amazon Cloud Drive removal. If you are not good at handling this method, you could try Method 2 as following.
Tips 2: How to delete Amazon Cloud Drive with Perfect Uninstaller?
If you can not follow the removal guides above, it is advised you to get rid of Amazon Cloud Drive with Perfect Uninstaller as following.
2. Close all running processes including programs and browsers in the Task Manager before you run Perfect Uninstaller
3. Find and locate the program on the currently installed programs list
4. Click “Uninstall” button on the right side to remove Amazon Cloud Drive.
5. Follow the prompt “Next” steps to delete Amazon Cloud Drive.
After you finish the onscreen removal steps, Amazon Cloud Drive has been deleted from your PC.
Can’t remove Amazon Cloud Drive? Perfect Uninstaller is your choice (100% Guaranteedhttp://www.uninstalltips.com/uninstall-ccleaner-guides-the-best-removal-tips-to-fully-remove-ccleaner-from-your-pc/
Force Uninstall Friends Checker - How Can You Totally Delete Facebook Friends Checker with Its Removal Guides?
Have you ever tried to force uninstall Friends Checker from your PC when it was corrupted?


Would you like to remove Friends Checker due to it always shows up the annoying error messages and let your computer be freezing?
Have you ever been frustrated that you have deleted Friends Checker, but it was still there when you restart up your PC?
When you are unable to get rid of Friends Checker by manual and you don’t know much about Friends Checker removal tips, you could learn and follow its uninstall instructions step by step in this article.
How to fully uninstall Friends Checker from your PC?
Method 1: Get rid of Friends Checker with a standard way
Tips 1: How to delete Friends Checker through Windows Uninstall applet
Most of you would like to get rid of program through Windows Control Panel. However, you might miss some steps so that you are not able to delete Friends Checker. Here are the software removal guides:
You should reboot your PC and press F8 key on your keyboard. This will open up the Advanced Boot Options screen, in Windows 7 or Vista, or the Windows Advanced Options Menu in Windows XP. Using the arrow keys on your keyboard, highlight the option labeled Safe Mode with Networking. Once it is highlighted, click on the Enter key on your keyboard.
Click “Start Menu” > Select Control Panel option > “Uninstall a Program” (Programs and Features) > Find Friends Checker on the currently installed programs list and its related entries > Click “Uninstall or Change” to delete the application.
And then, you should go back and click “Start Menu” button and select “Run.” > Type “regedit” into the box and click “OK” to open Registry Editor > search and locate all registry entries related to Friends Checker.
HKEY_CURRENT_USER\Software\Microsoft\Windows\CurrentVersion\Run\[RANDOM CHARACTERS].exe
HKEY_LOCAL_MACHINE\Software\Microsoft\Windows NT\CurrentVersion
After you finish steps, you should restart your pc to confirm the Friends Checker removal. If you are not good at handling this method, you could try Tips 2 as following.
Tips 2: How to force uninstall Friends Checker with Perfect Uninstaller?
If you can not follow the removal guides above, it is advised you to get rid of Friends Checker with Perfect Uninstaller as following.
2. Close all running processes including programs and browsers in the Task Manager before you run Perfect Uninstaller
3. Find and locate the program on the currently installed programs list
4. Click “Uninstall” button on the right side to remove Friends Checker.
Alternatively, you could right-click the folder of the unwanted program (normally, in C:\Program Files) and then select “Force Uninstall with PU” to apply the “Force Uninstall” utility.
5. Follow the prompt “Next” steps to delete Friends Checker.
After you finish the onscreen removal steps, Friends Checker has been deleted from your PC.
Can’t remove Friends Checker? Perfect Uninstaller is your choice (100% Guaranteed)
订阅:
博文 (Atom)